Skip to Main Content

EndNote Desktop

Use EndNote Desktop to add, manage, share and sync your references, and insert and manage citations in Word.

Setting up EndNote sync

What syncing does

  • Syncs your EndNote Desktop library with EndNote Online
  • Keeps your library up to date across multiple computers
  • Lets you share:
    • Your entire library via EndNote Desktop
    • Specific groups via EndNote Online

What you can sync

  • One library per EndNote Online account
  • Unlimited references and attachments
  • Up to 5,000 groups

Important notes

  • You can only link one library to an EndNote Online account
  • That account becomes locked to the synced library on that computer
  • You cannot sync multiple libraries or use multiple accounts on the same computer or RMIT login

Always sync and manage your library on your own personal computer to avoid issues

Sync to a new EndNote Online account

  1. Open your EndNote Desktop library.
  2. Windows: go to Edit > Preferences > Sync.
    Mac: go to EndNote 21 > Settings > Sync.
  3. Press on the Enable Sync button.
  4. If you do not already have an EndNote Online account, press on the Sign Up button.
  5. Enter your email address twice - you do not have to use your RMIT email account. This email address will become your login.
  6. Press Submit.
  7. Fill in all of the required fields that have a red asterisk (*)
  8. Click I agree.
  9. Your registration is complete. Press Done.
  10. The Sync process will authorise your new account and automatically add any references to your EndNote Desktop library.
  11. If you have references in the library, you will be asked to make a compressed backup. Please see the Back up page in this guide.
     

Note: The first time you sync it may take a while for the sync process to complete (especially if you have many references with full-text). Future syncing will be quicker. Your EndNote Desktop and EndNote Online libraries will now sync automatically.

Sync to an existing EndNote Online account

  1. Open your EndNote Desktop library.
  2. Windows: go to Edit > Preferences > Sync.
    Mac: go to EndNote 21 > Settings > Sync.
  3. Type your existing EndNote Online login and password into the EndNote Account Credentials fields.
  4. Press OK.
  5. You may be asked to register the computer for your EndNote Online account. Fill in all of the required fields that have a red asterisk [*]
  6. Click I agree.
  7. Your registration is complete. Click Sync.
  8. Press OK to save the settings.
     

Note: If you want to check how much space you have left in your EndNote Online library, select Sync Status on the left panel of your EndNote Desktop library. Ensure you are logged into your EndNote Online account first via your EndNote Desktop library.

Sync an existing account to a second computer

  1. If you have already created and synced an EndNote library on a first computer, make sure to note the library's name for step 4.
  2. Open your EndNote Desktop library on a second computer (Windows or Mac).
  3. Go to File > New.
  4. Create a new library with the same name as the original synced library.
  5. Windows: go to to Edit > Preferences > Sync.
    Mac: go to EndNote 21 > Settings > Sync.
  6. Type your existing EndNote Online login and password into the EndNote Account Credentials fields.
  7. Press OK.


Note:

  • The first time you sync it may take a while for the sync process to complete (especially if you have many references with full-text). Future syncing will be quicker. Your EndNote Desktop and EndNote Online libraries will now sync automatically.
  • Future syncing will be quicker. The synced library's references, attachments and groups will be added to the library on your second machine. Your computers will now sync to EndNote Online and update automatically. Remember to regularly back up your Word documents.

Sharing your EndNote Library or Groups

What you can share

  • Share with up to 100 people
  • Includes full referencesPDFs, and images

How to share

  1. Make sure your EndNote Desktop is synced with EndNote Online
  2. Go to: File > Share
  3. In the Groups panel (left side), select a group
  4. Click the Share this group icon on the toolbar

Sharing settings

A sharing window will appear:

  • Enter email addresses (separated by commas)
  • Choose Read & Write or Read Only access
  • Add a message (optional)
  • Click Invite

Recipients will get an email and must accept the invite using EndNote X7.1 or later


Copyright reminder

  • Do not share full-text PDFs from library databases unless allowed
  • Check website terms before sharing downloaded documents
  • Creative Commons content can be shared if you follow the license terms
  • You can safely share links to library or web content

Managing shared groups

What happens when you sync

  • Syncing your EndNote Desktop with EndNote Online may:
    • Duplicate group names or references
    • Introduce new groups from EndNote Online into your Desktop library
  • New groups from EndNote Online are automatically added to your My Groups list in EndNote Desktop

Check for duplicates

After syncing:

  1. Go to: Library > Find Duplicates
  2. Review the duplicate references carefully
  3. Before deleting, check your Word document to confirm which reference numbers are cited—this prevents deleting the wrong one

Refresh sync status

After making changes:

  1. Click Sync Status (top left of EndNote Desktop)
  2. Click Sync Now to update both libraries
  3. Also refresh your EndNote Online library to reflect the changes

Don’t forget to backup

  • Regularly back up your:
    • Word document
    • EndNote Desktop library using: File > Compress Library (.enlx)
  • This ensures you can recover your work if anything goes wrong

Backing-up your EndNote Desktop library

Why back up?

Creating a compressed EndNote library helps protect your work by combining:

  • Your .enl library file
  • Its associated .Data folder
    …into a single, smaller .enlx file that’s easier to store and restore.

How to create a Compressed Library (.enlx)

  1. Open your EndNote Desktop library.
  2. Go to: File > Compress Library (.enlx)
  3. Leave the default options selected:
    • Create
    • With File Attachments
    • All References in Library
  4. Click Next
  5. Choose a save location (ideally the same folder as your .enl and .Data files)
  6. Click Save

You’ve now created a compressed backup of your library.

compress an endnote desktop library
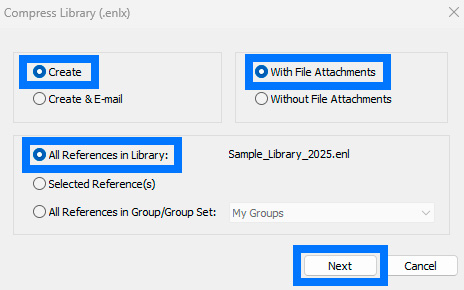
Image: Copyright © Clarivate. Used under licence.

How to use a Compressed Library (.enlx)

If your original .enl file becomes corrupt (e.g., won’t open, missing references, Word integration issues):

  1. Close the corrupt .enl file.
  2. Open the .enlx file (double-click it).
  3. EndNote will prompt you to create a new .enl file.
  4. When saving:
    • Do not change the filename
    • Save it in the same location as the corrupt .enl file
    • Replace the old file when prompted

This restores your library with all references and attachments intact.

Create a backup after every session

  • At the end of each session, create a new compressed library (.enlx).
  • This ensures your backup is always up to date.

Replace the old backup

  • Each time you create a new .enlx file, replace the previous one.
  • Keep only one compressed file to avoid confusion about which is the latest.

What to backup

You should back up all three components of your EndNote library:

  1. .enl – the main library file
  2. .Data – the folder containing attachments and settings
  3. .enlx – the compressed backup file

Save them together in the same location for easy restoration.

Where to store your backup

 Recommended:

  • Your local hard drive (e.g., C: drive)
  • Your desktop on a personal or RMIT computer
  • Emailing the .enlx file to yourself as an attachment

Avoid:

  • Cloud storage (e.g., Dropbox, Google Drive, OneDrive, iCloud)
    These can corrupt your EndNote library over time.

EndNote Online: not a backup tool

  • Do not rely on EndNote Online as a backup for your Desktop library.
  • If your Desktop library becomes corrupt, syncing can corrupt the online version too.

Use EndNote Online for syncing

  • EndNote Online is great for:
    • Accessing your library from anywhere
    • Syncing references, groups, and attachments
  • After syncing, both libraries (Desktop and Online) will be identical.
  • Sync regularly to keep both versions current.

E-mailing a large EndNote Desktop library

Use FileSender to send or receive large files, above the file-size limits set for RMIT e-mail. FileSender is a secure tool that allows you to quickly send files of any size. FileSender is perfect for sending a large EndNote Desktop library.

  1. Go to FileSender.
  2. Press the Login to FileSender button.
  3. Choose RMIT University from the list of institutions.
  4. You should be logged in automatically, but if not, log in with your usual RMIT login.

More information: