
Image: Changing referencing styles within Word's EndNote tab on Windows. Copyright © Microsoft. Used under licence.
Your document will automatically update to reflect the new style.
EndNote allows you to insert references in several ways:

The reference will be inserted into the text of the Word document, and a reference list or bibliography will be generated at the end of the document.
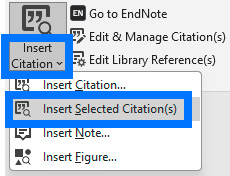
Image: Copyright © Microsoft. Used under licence.
Note: The selected references will be inserted as in-text citations, and their full entries will appear in your reference list.
Once you have inserted a citation, DO NOT edit it directly in Word. If you make any changes within the brackets of a citation they will disappear when you update the citations and bibliography.
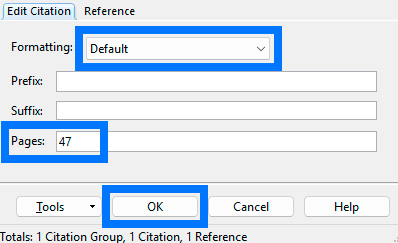
Image: Copyright © Microsoft. Used under licence.
Tip: If the referencing style you are using is not set up to show information from the Pages box (most of the journal output styles are not) then you add page numbers in the Suffix field, including punctuation e.g. , p. 47 (a space before the comma is necessary).
Note: This removes the citation from Word only, not from your EndNote library.
Deleting a reference from EndNote before removing it from Word can corrupt your Word document.
When writing over an extended period, regularly unformat and reformat citations. You can work with unformatted citations and reformat weekly to ensure accuracy.
To unformat citations from the EndNote tab in Word:
To reformat citations click Update Citations and Bibliography.
Unformatting removes citation formatting and temporarily hides the bibliography.
Before merging chapters with citations, unformat all documents, combine them, then reformat.
Open your Word document and go to the EndNote tab.
Select Configure Bibliography:
In the Configure Bibliography window, go to the Layout tab.

Image: Windows Configure Bibliography button within Word's EndNote tab. Copyright © Microsoft. Used under licence.

Image: Mac Configure Bibliography button within Word's EndNote tab. Copyright © Microsoft. Used under licence.
There are two methods for creating a standalone plain text bibliography:
Note: This creates a separate .rtf document containing your formatted bibliography.
Note: This method is quick and ideal for inserting a bibliography into an existing document.
Tip: To include both chapter-specific and cumulative bibliographies, use an output style that supports sections or Word’s Master Document feature.
This is field shading. To fix the problem:
Sometimes, instead of seeing your regular in-text citations, there is a strange code, which looks something like:
ADDIN EN.CITE <EndNote><Cite><Author>Burwell</Author> <Year>2005</Year><RecNum>39</RecNum><record><rec-number>39</rec-number " ...
What you are seeing is the hidden field codes in Word. This is the hidden code EndNote uses to hold the reference information for your formatted citations. To fix the problem:
Note: This is a universal setting for Word, so making this change should fix any other Word documents on your device that are currently displaying field codes.
There are several reasons why the EndNote tab may not display in Word, solutions follow.
Windows
Mac
Windows & Mac
Windows & Mac
If you are using EndNote 2025 and insert a citation into a new Word document, the in-text citation and bibliography may display incorrectly:
To fix the problem (for Windows and Mac):

Image: Copyright © Microsoft. Used under licence
Note: You may need to repeat this process for each new Word document.
EndNote adds hidden field codes to your Word document. Improper copying or deleting of references can corrupt these codes and affect citation formatting.
To check for EndNote code, select a paragraph—if parts highlight in dark grey, it contains embedded code.
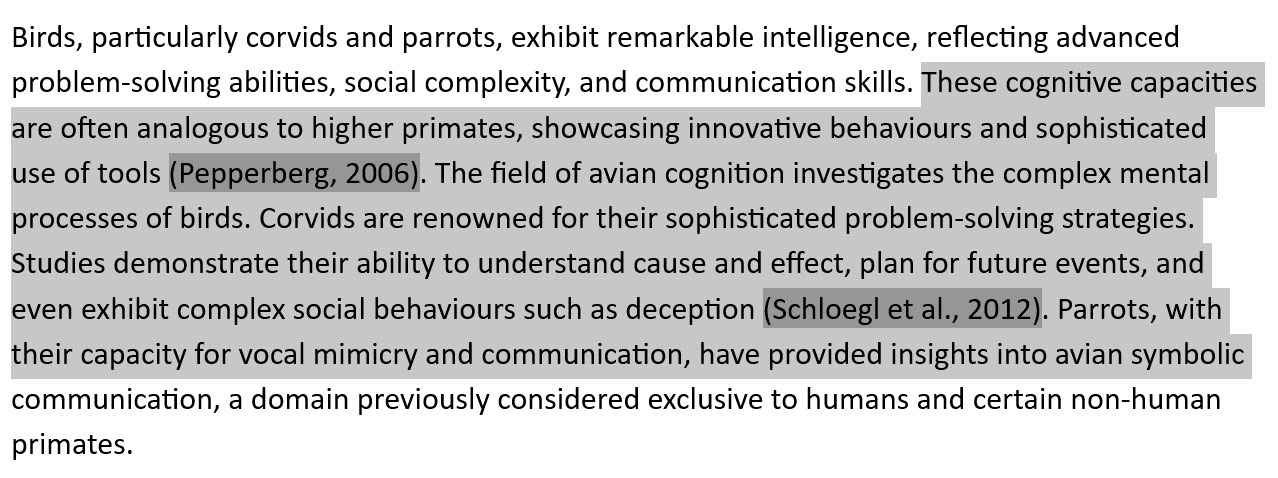
Image: Copyright © Microsoft. Used under licence
Before copying or cutting text that includes citations:
Citations will now appear like this:
{Author, Year #RecordNumber}
e.g. {Chinowsky, 2006 #58}
You can now safely copy or move the text.
After pasting, select Update Citations and Bibliography in the EndNote tab to restore full formatting.
You can choose to keep or remove EndNote field codes when copying text to another document.
Convert citations to unformatted to avoid formatting issues:
EndNote doesn’t work well with Track Changes.
Accept/reject changes first, then select Update Citations and Bibliography in the EndNote tab.
Before submitting your thesis or paper, remove all EndNote field codes to avoid issues with publishing software.
 This Library guide by RMIT University Library is licensed under a CC BY-NC 4.0 licence, except where otherwise noted. All reasonable efforts have been made to clearly label material where the copyright is owned by a third party and ensure that the copyright owner has consented to this material being presented in this library guide. The RMIT University logo is ‘all rights reserved’.